Monday, November 30, 2009

Challenge 55 - Using Negative Space

This weeks challenge is to design using negative space. You know, the "outside" of die-cuts, the "backing" of chipboard letters, the "other part" of stencils. You can use the "actual" piece of negative space on your layout, or use it like a stencil with spray ink, paint, etc. You could even journal within negative space. Here's what our Design Team came up with:

Amanda -

I created a stencil using a photo. I then spray inked the "negative space" around my stencil, which included the shadows in the photo, to create a background. I then used some of the white space in the spray inked image as a place to put my photos and title. A complete "how-to" for the background will be available on my blog after this post goes live.

Helga P. Vergara -I used the backing of my chipboard embellishment set as a frame for my photos.

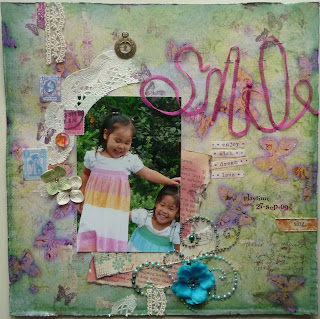
Kimmy
I used the negative space from some Maya Road chipboard people as a reverse mask to create my lady on the right. I covered the man shape with paper and then sprayed glimmer mist into the lady shape. After it dried I outlined it with a pen to give it more definition, then I decorated it. I also used the negative space from the chipboard 3 in my title as an accent near the photo. Made mainly with the Fall Bliss Kit from Scrapbook Get- Away.

Michelle -

I used the backing from a sheet of chipboard letters and painted it in two tones of green. The circles are the perfect spots to place photos, papers, and embellishments. The letter E is also a leftover chipboard negative.

Deborah -

I used the edge from a bracket sticker to frame a piece of patterned paper. I also used the negative space from the chipboard arrow as a mask to ink a few arrows along the bottom of my patterned paper.

Now it's your turn! Can't wait to see what you come up with.

Sunday, November 29, 2009

Challenge 54 - Slide Show & Winner!

I was thrilled to see all the fantastic layouts for this challenge - taking design ideas from a magazine. You guys always make it hard to choose!

A little late, here's the slide show. We just got back from a trip to Australia and, well, leave it to my husband to leave out important things -- including that I'd be virtually internet-less during the stay. So, without further ado . . .


And the winner for this challenge is July Gaceta! Please send us your addy via the email link.

Sunday, November 15, 2009

Challenge 53 Winners!

Oops! I missed posting the winners by a full 6 days.... sorry to those of you who came looking earlier this week to see if you were selected. I just realized tonight as I was getting ready for tomorrow's challenge (a FUN one, by the way) that I had not posted the winners yet.

So, our winners are:

KeriK, who gets the first add-on for her wonderful minibook! Make sure you take a look at this beautiful book, folks.

and, by random draw:

Penny, who gets the second add-on.

Thanks again to Studio Calico for the goodies. Ladies, send me your addresses and I will get those kits out to you lickity-split.

Ribbon Titles

Challenge 55 - Writing with ribons!

Finding a title can be the best part of scrapbooking... as it can be the worst nightmare. After all, it IS the final touch in a layout, isn't it? What a pleasure to go through our stash looking for letters in the right size, the right colour, the right design ... Well, this time we are going to write our title not with those beautiful alphabet letters but with... ribbon(s) or anything similar! I hear you sigh: it's so difficult to glue, it's not easy... I know, I know but... it's also so beautiful too!! Why don't you have a go and show us what you can do? You have until December 6th to show us your full creativity! Have fun!
Here you are what we've done!

Jennifer- I made my title out of small pieces of ribbon, which I adhered with a Scotch photo-splits runner. (Sorry about the wonky background color - white/off-white confuses my scanner!)


Amanda- I created a portion of my title by adhering strips of ribbon to a chipboard letter. I went through several design iterations of this page, one of which includes the entire title with the ribbon treatment. You can see these other iterations on my blog after this post goes live.


Michelle- There are so many great ways to interpret this challenge! I ran a wide red ribbon through a die cut machine to create the heart. The letters are hand cut from twill tape and machine-stitched to my page. I was planning to use Fray-Stop to prevent stray threads around the cut ribbon, but decided I liked the home-spun look it created.


Kimmy- I drew my large letters on a piece of cardboard backing then covered them with strips of ribbon. Inspired by a sketch from Scrapbook Get-Away.


Miwako - I use a wire mesh ribbon which is narrow tube, material is very soft and easy to fix a variouse shape. I play to mix a lots material (poststamp, metal, race, pearl, line stone, vintage, romantic and fantastic). I think that this ribbon is useful for making balance of the different feel materials.


Monday, November 2, 2009

Challenge 54 - Design Ideas from Magazines

If your house is anything like mine, you probably have magazines lying around the house. And if you're really like me it's waaaaay too many magazines. And that doesn't even count the daily deluge of catalogs we're getting now that it's getting closer to Christmas.

So my challenge to you is a design challenge. Pick something from a magazine to inspire you, design-wise. It can be an ad or photo, a pattern, a color combination, a page design - whatever you like - and use it on a layout.

Here's what our team came up with:

Deborah:
I chose to mimic the array of mushrooms in the above picture. However, I used Halloween embellishments to frame my photo, instead of text.


Miwako:

I was inspired by a page of wedding catalog magazine. I love this colore, score and ribbon and feel so crassic and nostalgic. I use variouse ribbons in my layout and imagine cristimas decolation and gift package.


Paloma:

For this challenge I chose to work little flags like the ones you see in fancy fairs and other such festive gatherings and that I keep finding in scrap layouts and magazines.
To hold them together, I chose a white thread/wire because it winds and unwinds nicely throughout the bubbles. Little flags, bubbles looking like white balloons everywhere: yes, this was a festive time... but hush now, the baby is asleep!


Michelle:

I tore this ad from a boutique baby catalog several years ago and filed it away in my art inspiration binder. This week's prompt was the perfect excuse to finally work this into a layout. I was drawn to the playful circles and happy colors, and repeated both in my layout:


This page was done on a piece of duck cloth canvas prepped with gesso.

Amanda:

I was inspired by pieces in the November/December 2009 Somerset Studio magazine. These pieces were wedding themed created with a neutral color scheme. I loved the color scheme applied to the theme, but wanted to create a more urban distressed look, instead of vintage look distressed look.

I will post a layout how-to on my blog after this pose goes live.

Kimmy:

I was inspired by the back cover of my Crate & Barrel catalog. I loved the multicolored, layered circles & duplicated them with Glimmer Mist (which I rubbed on with a piece of felt). The ornaments inspired my Christmas theme & the vertical lines of the silverware inspired my title placement.


Helga:

I used this page from an airline magazine. I was really struck by its color and page layout particularly the white space on top. I used these elements as my inspiration in creating my layout.
Here is my take:


So break out your magazine stacks, rummage through your junk mail and see what inspires you! Post your creations here, and your inspiration piece, by Sunday night, November 15th to be considered for a RAK.

Check back....

Thanks to all who participated in the Patterned Paper challenge. What a great range of layouts we had! Take a look at the entries in the slide show below, and then check back NEXT Monday, when I will announce our winners.

Also, Challenge 54 will post later today!

Challenge 53 Slide Show